Hello!
I have another tutorial for you today!
There are lots of tutorials for baby mittens around the internet, but I haven't actually seen one for my favorite style. These have a stretchy cuff that is snug enough to keep the mittens on baby's hand, but not too tight like elastic can sometimes be. The inside is lined, and there are NO raw edges, anywhere!
You can make these out of any type of material. Above, I have soft jersey knit (gray), quilting cotton (hounds-tooth), and super-soft minky (striped). I like them all, but I think my favorite is the knit. It's more lightweight for this warmer weather we've been having.
Baby mittens aren't just for winter! They keep baby Cole from scratching his face with his quick growing fingernails. I also like to use them on cool early morning car rides to take my oldest to school. Cole also loves chewing on his fingers, and chewing on fabric, and this way he gets to do both at the same time!
Shall we begin? Here is what you'll need:
*Pattern
*Ribbed knit (or very stretchy jersey knit)
*Fabric for the outside (jersey knit, quilting cotton, flannel, or soft minkys)
*Fabric for the lining (a soft lightweight knit works best)
Pattern- You can very easily make your own pattern. For the cuff, you'll need a 4" square. For the mitten, you need a square that is 3.5" tall, and 3.75" wide. Just gently round the top two corners to make a nice roomy mitten shape. I started rounding in at about 1.5" up. See below:
*IF you decide to use stretchy knit fabric instead (like t-shirt fabric), make sure it has a lot of stretch to it! The direction of the stretch will be important when we sew the cuff, so pay attention to which direction is the stretchiest.
Step 2: Cut four mitten pieces from your lining fabric. A nice soft lightweight knit would be most comfortable. I just re-purpose old t-shirts for this!
Step 3: Cut four mitten pieces from your outer fabric.
Now that we have all our pieces cut, it's time to start sewing them together!
Step 4: Pin everything, right sides together!
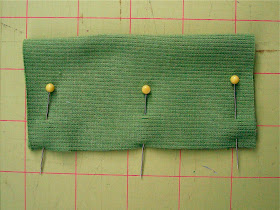
For the cuffs- fold the ribbing in half, so that the lines run in the same direction as the fold, and the same direction that you will be sewing your seam (along the long bottom edge, opposite the fold).
*If using stretchy knit instead of ribbing- Direction of the stretch is important! Using my photo below as an example, the LEAST stretchy direction is right to left (or side to side). It is stretchiest up and down, so that the cuff can easily stretch open to put it over baby's hand.
Step 5: Sew!
-Sew up the long side of the cuff. (I use about a 1/4" seam allowance for everything) Do not stretch the fabric as you sew!!
-Sew the outer mitten pieces, leaving the flat bottom open.
-Sew the mitten lining pieces, leaving a 1.5" opening on the side of each one for turning.
This is just a closeup of the lining pieces, so you can see the opening I left for turning.
Step 6: Clip little triangles around the curves of all mitten pieces. This will reduce bulk and make everything lay nice and flat. Don't clip too far in and cut the seam! Here is what everything will look like after you have sewed all your seams and clipped the curves:
Step 7: Turn JUST the lining pieces right side out.
Step 8: To fold the cuff over so that the seam lays flat, here is what I do. Open the seam up and grasp it in the middle where you're going to make your fold. Holding your thumb over the seam to keep it open, fold the right side down so that the ends meet. Then adjust your grasp to pinch both seams together.
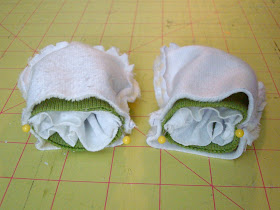
Step 9: You're going to put all your pieces together to sew the final seam. This picture illustrates in what order they will be- the cuff goes inside the outer mitten pieces. The lining (right side out) will go inside the cuff.
When you put the cuff inside the outer mitten piece, line up the seam of the cuff with one side seam of the mitten.
Then slide the lining inside the cuff. It will be a tight squeeze, but it will all work out! Making sure all four of the raw edges line up, and the seams are lined up too, pin on each side seam.
Put your fingers inside all three pieces and stretch it out, from side to side.
Place a pin in the middle of the top and bottom. This will ensure that the cuff is stretched evenly.
Now both mittens are assembled and ready to sew!
Step 10: Sew! You'll be sewing from the inside. Slide the edge under the left side of your foot, and line it up so you have about 1/4" seam allowance. Start sewing by going back and forth a couple of stitches to secure it.
Now stretch as you sew, stretching the cuff out to the size of the outer mitten piece. It's OK if the lining becomes a little bunched in places. Stretch and sew, all the way around, going back and forth again when you get back to where you started.
It's all sewed up!
Step 11: Pull the lining out, and then pull the cuff and the outer piece through the opening. Everything will end up right side out.
Step 12: Close up the opening. You can hand stitch, but I chose to just machine stitch it closed. Fold in the raw edges, and then sew it closed, as close as you can get to the edge.
Step 13: Tuck the lining up inside the outer piece, flip the cuff down, and you're done!!
Thank you for following along, let me know if you have any questions! And if you make a cute little pair of mittens, I'd love to see them!!


